The best small-garden irrigation system is the one that matches the footprint, can be checked easily and does not create more fittings than you can maintain. For a patio, container group or raised bed, start by mapping the water source, route and planting zones. Then choose between hand watering, soaker hose, in-line drip tubing or individual emitters.
Do not begin with a kit because the box contains many parts. Begin with the plants and the route the water must take. A short, visible system with a filter, pressure control, flush point and simple timer can be more useful than a larger system that disappears under mulch and is difficult to troubleshoot.
Quick answer: Map one water source to one manageable zone, keep tubing runs short and accessible, use components matched to the water pressure and emitter type, and test every connection before covering the line. Let soil moisture, weather, crop stage and container size determine the run time rather than copying a fixed schedule.
1. Map the source, route and planting zones
Take a quick site inventory before you buy tubing. Identify the nearest spigot, hose connection, rain-barrel outlet or other permitted water source. Then trace the route to the bed or containers. Measure the distance, count corners and note where the line would cross a walkway, doorway, stair or area where a mower, cart or chair needs to pass.
A small garden usually becomes easier when one zone serves plants with similar watering needs. A sunny raised bed, a shaded herb container and a hanging basket may all need different checks. Putting them on one timer does not make them one system; it simply hides the differences until a plant is stressed or a container stays saturated.
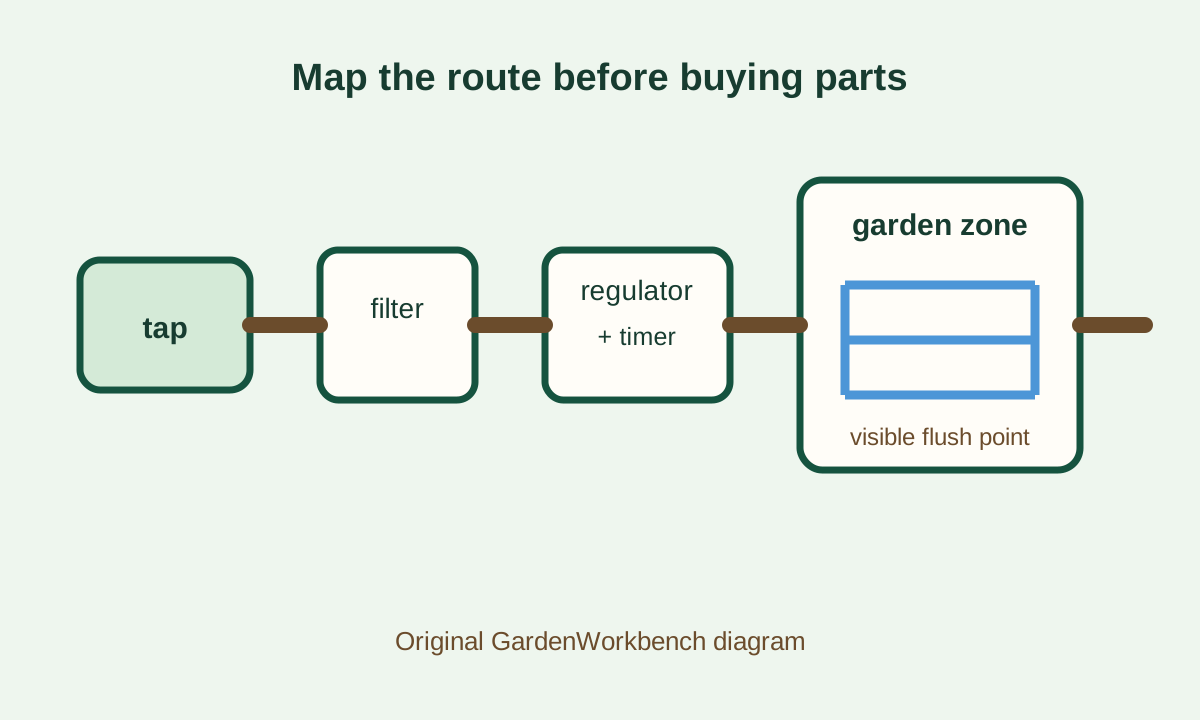
Draw the route in three layers
- Source layer: spigot, hose connector, approved water supply and shutoff.
- Control layer: filter, pressure regulator, backflow or anti-siphon protection where required, timer and mainline.
- Plant layer: drip tubing, soaker hose, individual emitters, end flush point and the plants or rows being watered.
The exact parts depend on the source and the product system. Follow the manufacturer's compatibility instructions and local requirements. If you are connecting to a potable-water spigot, use components intended for that connection. If you are using collected or non-potable water, assume filtration and maintenance requirements are different until the source and product instructions confirm otherwise.
2. Choose the simplest delivery method that fits
You do not need the same irrigation method for every small garden. Hand watering can be the most practical choice when there are only a few containers or when you are still learning how the site dries. A soaker hose can cover a simple bed with fewer individual connections. In-line drip tubing is useful when the emitter spacing matches the planting layout. Individual emitters or button drippers make sense when plants are scattered or have clearly different water needs.
| Method | Useful when | Trade-offs to check |
|---|---|---|
| Hand watering | A few containers, changing crop needs or a garden you inspect daily | Takes time and can be inconsistent if the route is awkward |
| Soaker hose | A relatively even bed or short, level run | Long runs can water unevenly; flush and inspect the hose regularly |
| In-line drip tubing | Plants follow predictable rows or repeated spacing | Needs clean water, suitable pressure and compatible fittings |
| Individual emitters | Containers or plants are spaced irregularly | More parts and more points that can clog, leak or be knocked loose |
| Sprinkler | A broad area where foliage wetting is acceptable | Can wet leaves, encourage weeds and overspray paths or walls |
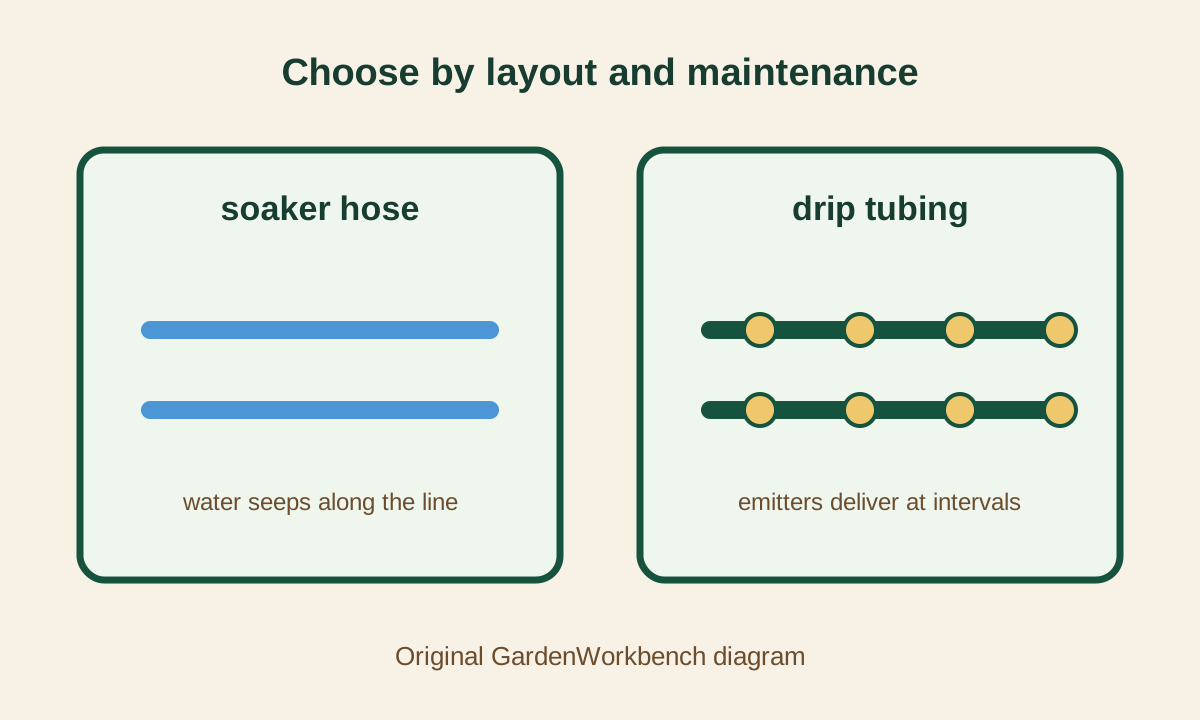
Colorado State University Extension describes in-line drip tubing, soaker hose and individual drippers as different drip approaches rather than interchangeable pieces. Treat the product's stated flow, spacing and pressure range as part of the design, not as details to read after installation.
When hand watering is actually better
A drip system is not automatically an upgrade. Hand watering may win when your garden has fewer containers than the tubing package has connectors, when you move pots often, or when the water source is temporary. It also gives you a chance to learn which containers dry first before you automate the routine.
Automation becomes more useful when the route is repeatable, the plants have similar needs and being away from the garden would otherwise cause missed watering. Add it because it solves a specific problem, not because a timer makes the setup look complete.
3. Lay out tubing for access, not just coverage
A good layout keeps lines short, visible and easy to disconnect. On a rectangular raised bed, parallel runs often make more sense than a tangled loop. Keep the line close enough to the root zone to deliver water where plants are growing, but leave enough access to weed, transplant and inspect the soil.
For a bed about four feet wide, Colorado State Extension illustrates multiple runs across the bed with approximately twelve-inch spacing as a starting layout for many block-style plantings. That is a planning reference, not a universal spacing rule. Large plants, wide rows, sandy mixes, mulch and emitter output can change the result.
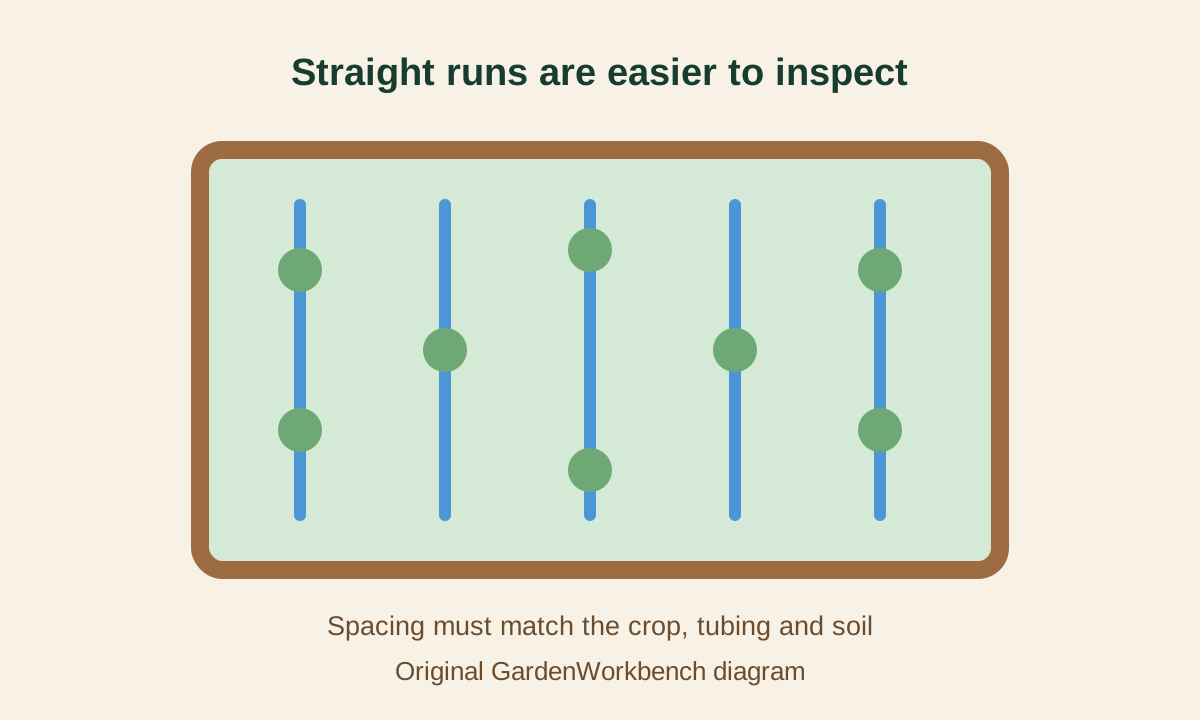
Keep runs and zones understandable
Label the start and end of each zone. Leave a visible flush point at the end of a line when the product system requires it. Use gentle curves instead of sharp kinks, and secure tubing so it does not move away from the root zone after watering or foot traffic.
If several beds are supplied from one mainline, calculate whether the flow and pressure are appropriate for all of the connected components. A system that works with one short run may lose uniformity when more tubing and emitters are added. Add a second zone when the plants, elevation or flow requirements are genuinely different.
Plan around the bed first
The University of Georgia Extension notes that drip irrigation is easier to install when raised beds are arranged in an orderly pattern, preferably a straight line. That makes the irrigation decision part of garden layout. If the beds are scattered around a patio, you may spend more time routing and protecting the mainline than watering plants.
If you are still choosing the bed, choose the bed layout first and reserve a route for water before filling it. If the bed already exists, do not force a perfect grid. Use the shortest, clearest route that lets you reach the plants and inspect the system.
4. Match pressure, filtration and fittings
Drip components are designed for controlled, relatively low pressure. Household spigots can deliver more pressure than small tubing or connectors can tolerate. A pressure regulator, filter and compatible hose-end parts may be required, but the correct specifications depend on the system and water source.
Pressure regulator
A regulator reduces incoming pressure to the range the irrigation components are designed to use. Do not select a regulator by appearance or by a generic number from another kit. Check the tubing and emitter instructions, connection size and expected flow. If the garden changes elevation, pressure can vary along the route, so a sloped site needs additional attention.
Filter
Drip emitters and small passages can clog with dirt, algae, salts or other particles. Colorado State Extension warns that drip systems require relatively clean water and that non-potable sources may require more expensive or higher-maintenance filtration. A rain barrel or gray-water source is not automatically suitable because the water looks clear.
Install the filter where it can be opened and cleaned. If you bury it behind a planter, you have made routine maintenance harder. Check the filter after the first few uses and after any work on the water source.
Timer and backflow protection
A timer can reduce missed watering, but it cannot decide whether the soil is actually ready for more water. Use a timer only after you have observed the zone manually. Keep the vegetable or container zone separate from lawn irrigation when their needs differ. Follow local plumbing requirements and the timer manufacturer's instructions for backflow or anti-siphon protection.
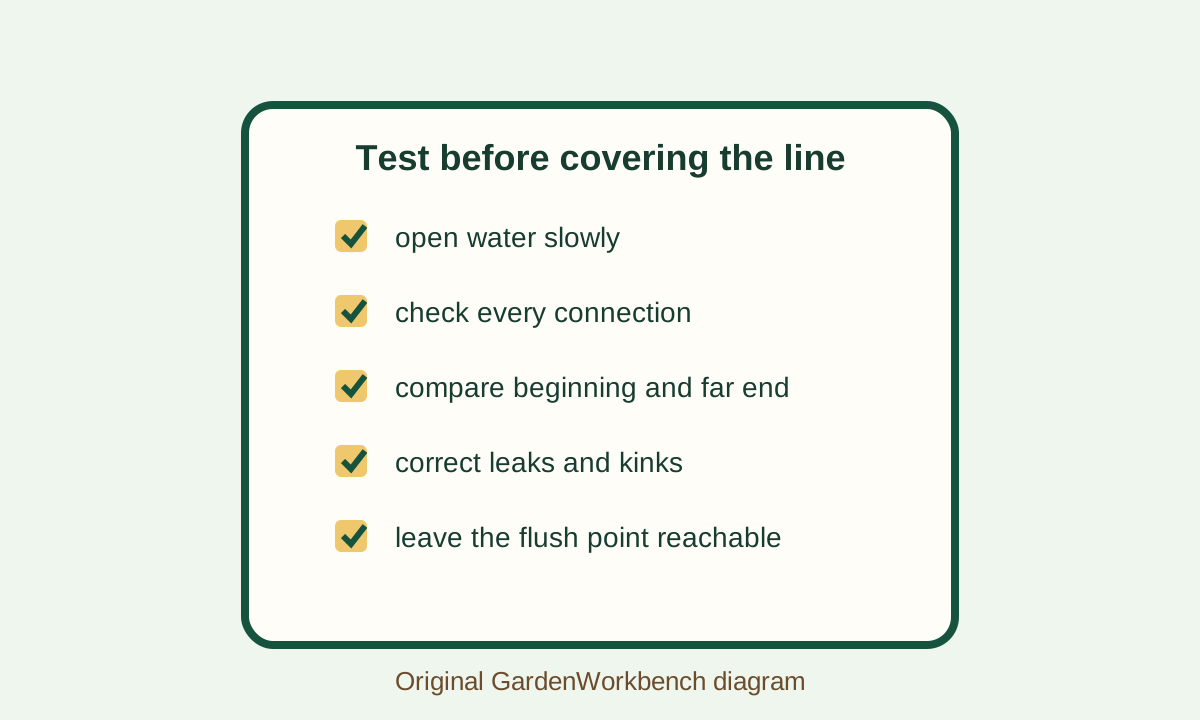
5. Test the system before planting or mulching
Do not cover the line on the first day. Run the system while every connection is visible. Walk the entire route and look for leaks, kinks, disconnected fittings, sprays where a drip should occur, and dry sections at the end of the run.
A simple test sequence
- Close the flush point or end cap according to the product instructions.
- Open the water supply slowly and let the line fill.
- Check the first connection, every branch and the far end.
- Confirm that emitters or soaker sections are delivering water as designed.
- Place a small container or use a soil probe to compare the beginning and end of the zone.
- Shut off the water and correct leaks before adding mulch.
- Run the zone again after any correction.
The goal is not to prove that water came out somewhere. The goal is to check whether the intended plants and root zones receive a reasonably consistent supply without damaging the line or washing soil away.
For a new raised bed, test before plants go in. For an existing bed, test before a hot spell or an extended absence. If the system uses several zones, test them separately first and then together if the controller and source are designed for that load.
6. Let soil moisture set the run time
Avoid fixed promises such as “run this system for exactly twenty minutes.” Emitter output, pressure, tubing length, soil texture, mulch, temperature, wind, crop stage and container size all change the result.
Colorado State Extension suggests checking moisture in the rooting zone and notes that vegetable water demand changes with weather and crop development. The practical lesson is to use the timer as a repeatable starting point, then adjust after checking the soil. If the top surface looks dry under mulch, inspect deeper rather than watering by appearance alone.
Check three places
- Near the first emitter or beginning of the run. This area can receive water sooner or more strongly if the system is not balanced.
- In the middle of the zone. This shows whether the layout is distributing water beyond the first section.
- At the far end. Dryness here can indicate an overly long run, clog, kink, low pressure or incompatible flow demand.
Containers need special attention because they have less soil volume and can dry faster than a bed. A timer that is acceptable for a deep raised bed may keep a small pot saturated. Group containers by similar size and exposure when possible, or give them separate emitters and checks.
7. Maintain the system through the season
A drip system is a small plumbing network in a living garden. It needs inspection, especially after moving containers, weeding, storms, animal activity or repairs to the spigot.
Weekly or regular checks
- Look for wet patches, dry patches and water spraying from a connection.
- Check the far end of each line.
- Inspect the filter and clean it according to its instructions.
- Confirm that tubing has not moved away from the root zone.
- Check the timer schedule after battery replacement or a power interruption.
- Look under mulch before assuming a dry plant needs more fertilizer.
- Check containers individually rather than trusting the zone label.
Before a trip
Run the system while you are still home. Inspect the plants after the run, then check them again later. Do not automate a new system the night before leaving. A disconnected hose, blocked filter or failed battery can change the result quickly.
End-of-season care
Follow the tubing and timer manufacturer's storage instructions. In climates with freezing temperatures, drain or remove components that could hold water and crack. Label the zones before disassembly so next season's layout is easier to rebuild. Replace damaged connectors instead of hiding them under mulch.
8. Troubleshoot from the plant and the line
| Symptom | First checks | Likely design issue to investigate |
|---|---|---|
| Water at the source, dry at the far end | Kinks, filter, length and pressure | Run is too long or the zone has too much demand |
| One spot is flooded | Loose fitting, damaged line or emitter | Water is escaping at one point instead of distributing evenly |
| Emitters clog repeatedly | Filter, water source and cleaning routine | Water quality or filtration does not match the component |
| Containers stay wet | Pot size, emitter flow and timer | Containers should be separated from deeper beds or run less often |
| Tubing pops off | Connection size, pressure and warm tubing | Pressure or fitting compatibility is wrong |
| Plants wilt despite a wet surface | Rooting-zone moisture, roots and heat | Water may not be reaching the root zone or drainage may be poor |
A moisture problem is not always an irrigation problem. Wilting can also reflect root damage, disease, heat, poor drainage or a plant that has outgrown its container. Inspect the plant and soil before increasing the timer.
Common mistakes to avoid
Buying a kit before measuring
A kit with extra tees and emitters is not a plan. Measure the source-to-bed route, bed width, container count and desired zones first.
Hiding every connection
Connections need inspection and occasional replacement. Keep control parts and likely failure points reachable.
Running one zone for incompatible plants
A large raised bed, shallow tray and hanging basket may not dry at the same rate. Separate them or accept that each will need individual checks.
Skipping filtration
Clear-looking water can still carry particles that clog small passages. Match filtration to the source and the irrigation components.
Using a fixed timer schedule forever
Weather, plant size and mulch change. Treat the schedule as a starting point and check soil moisture.
Forgetting the flush point
If a line cannot be opened or flushed as the product requires, cleaning becomes difficult. Plan the end of the run before the tubing is covered.
Treating a leak as harmless
A small leak can become a flooded spot, a dry far end or a failed connection. Correct it while the line is visible.
Frequently asked questions
Is drip irrigation worth it for one raised bed?
It can be, especially if the bed has a stable layout and you want a repeatable watering route. For a few plants that you inspect daily, hand watering may be simpler. Compare the installation and maintenance effort with the time you want to save.
Is a soaker hose or drip tubing better for a small garden?
Neither is universally better. A soaker hose can suit a short, relatively even bed. In-line drip tubing can suit rows with predictable spacing. Compare length, pressure, filtration, emitter spacing, replacement parts and how easily you can inspect the route.
Can I connect drip irrigation to a rain barrel?
Possibly, but do not assume that a rain barrel has the pressure or water quality the system requires. Small emitters can clog, and a gravity-fed barrel may not supply enough pressure for the layout. Check the irrigation product requirements and the water source before connecting it.
How long should I run drip irrigation?
There is no reliable universal duration. Measure the emitter output or observe the wetting pattern, then check moisture in the root zone. Adjust for weather, crop stage, soil, mulch, container size and the far end of the run.
Should drip tubing go under mulch?
Many systems can be placed on the soil surface under mulch, but follow the tubing instructions and keep the line accessible for inspection. Do not bury connections so deeply that you cannot find or repair them.
Do I need a pressure regulator and filter?
Many small drip systems need both, but the exact parts depend on the source, pressure, water quality and component specifications. Check the system instructions rather than assuming a generic hose connector is enough.
Useful Sources And Verification
Use these extension sources to verify layout, pressure, water quality and raised-bed irrigation decisions:
- Colorado State University Extension: Irrigating the Vegetable Garden — soil-moisture checks, controller zones, drip types, filtration, pressure and run-time variability.
- University of Georgia Extension: Raised Garden Bed Dimensions — access, bed layout and why irrigation is easier when beds follow an orderly pattern.
- Utah State University Extension: Raised Bed Gardening — raised-bed irrigation, soil, drainage and planning considerations.
Verify the current product instructions for tubing, emitters, filters, regulators, timers and connectors before installation. Confirm local plumbing or backflow requirements where applicable. GardenWorkbench does not claim that one schedule, pressure setting or component layout works for every garden.